Sunday, 6 July 2025

Birds and Butterflies


Here are some recent nature pictures, while the weather is too hot for sewing.

This fluffy chap was snapped on my choisya bush, enjoying a bit of sunshine. 

 Meanwhile, the young blackbird has taken to cooling off in the water dish, causing a good splash every time

Down on the lake, there have been lots of young birds this year. This proud greylag
mum is keeping her family close on one of their first ventures into the water. I like their little feet stuck out at the back.


Meanwhile the coot family are getting the hang of it, and look like they will soon be off in all directions.


While these geese just want to snuggle down for a nap - after a bit of preening, of course. 

Sunday, 9 February 2025

On The Shelf


It's always nice to get a belated birthday present, especially when it is something to make. This needle felting kit has waited a while to make the journey north, but it didn't stay in the box long once it had arrived. 

I was curious about the name - who was Henry Coles and why did he have a rat? A bit of research led me to this rather gruesome page from the National Archives, but for the faint-hearted, the story is that Henry Cole found the remains of several rats among documents while working in official archives. These were presented as evidence to a Select Committee in 1836, to show the poor state that documents were being allowed to fall into. According to the National Archives website, the skeletons of two of the rats are kept in a box among their collection. I felt rather sorry for the rats. The old documents can't have made a very pleasant diet, nor very interesting reading matter, really.

The kit was produced by The Makerss,  and was a real pleasure to use. All the equipment was included, along with very easy step-by-step instructions and photos of every stage. The wool was very soft and easy to felt, and there was a generous amount of it. The company also has good eco credentials - the wool is organic and all the packaging was plastic free. They also included wool felting mats, which I found much better than the foam ones I had. 


The Rat with his well-rounded bottom.


The kit included a bit of parchment for the rat to hold and some gold wire to make a monocle, but I decided my rat would be a less scholarly type, and so he has a cheerful red scarf instead. I also used black beads instead of the eyes provided, because I liked them a bit smaller.  

A browse through The Makerss website reveals a whole range of beautiful kits, with some very charming characters. I certainly wouldn't be disappointed if I received another untimely birthday present from there. 


The Rat has joined a group of random characters who have gathered on the bookcase.
Hopefully he won't be tempted to nibble any of the books.


Another addition to the shelf this week is a new Useful Pot. This one was made from a stitch sampler that had filled up and was just lying around being in the way. The sampler was sewn on a dark blue backing covered with scraps of different textured cloth, including velvet, chiffon and silk. Rather than fall back into the safe habits of embroidery floss, I made an effort to use different textured threads. I kept it to hand, and added a bit whenever I wanted to try something out, or, really, whenever the fancy took me. Because it was small, it was ideal to take on a train journey. 


To make it into a pot, I sewed on a backing, and then cut a cardboard circle for the base (using trial and error rather than maths for the size). I covered the circle with matching fabric by sewing round the edge of a large circle and then gathering it up tight. The gathered edge was hidden with a circle of felt inside the pot. Then I sewed the sampler edge to the base using whip stitches in strong cotton over the raw edge, continuing up the side to join the two ends of the sampler.

For the pot to be functional, I didn't want the top edge to be raw, so I unearthed a scrap of bias binding. I used embroidery stitches to attach the outside edge, so that it blended into the rest of the pot, and then turned over the inside edge to cover the backs of the stitches.  

So far, it doesn't have anything in it, but handy pots and bowls tend to attract random objects, so I'm sure this one will soon be earning its keep. 


Sunday, 2 February 2025

Granny Squares and Kantha Kat


My Kantha Kat


Number three in my resolution to try out new techniques is a kantha cat.  I found some very crumpled muslin in the bottom of the box, and after a quick iron, cut two squares for the front and back. I sandwiched a scrap of old sheet in between to give it a bit of body. Because it is just a sample, I drew a quick freehand design onto the muslin, keeping the shapes simple and big enough for some rows of stitching inside. I outlined this in red backstitch, and then used embroidery floss for the running stitches inside the shape. I quickly regretted using the yellow thread, as it doesn't show up well (will I ever learn this?) I added eyes and probably should have given him a nose as well. The poor thing has 'experiment' written all over him. 
For the running stitch in the background I used the cotton from the old loom bodkin, which is strong and very smooth for stitching. I echoed the shape of the cat to begin with, but then went all over the place, contributing to the demented lines and the lumpy shape of the finished mat. Being muslin, it was easy to turn over the edge and neaten with an edge stitch. So rather a mixed result. It has a pleasing texture and I could see making lovely cheerful designs using this technique, but probably not something that I would make into a finished piece. 

 
Good old granny squares

Last year's attempt at a wrap around crocheted skirt was added to the official failure list after a few wearings, because it was so bulky to move about in (although it was very warm). It has been painstakingly unravelled, a slow business because it was composed of stripes that changed colour every row or two. With a sizeable collection of different coloured miniballs, the obvious thing to do was to make granny squares. I had forgotten how to do them, but a bit of googling had me on track and production began. The granny squares turned out lighter in weight than the double/treble stitches in the original skirt pattern, and I did contemplate making them into a different version of the skirt.  I started sewing them into a rectangle, and part way through, it got put down on the wooden box of fabric in the sitting room. It seemed to settle down nicely, and so it will probably remain there as a cover, - at least for the time being. 

Sunday, 26 January 2025

Finished Fairy Tales

The finished Fairy Tale Quilt, a bit blurry and distorted because it is a windy day out there. I found that I can't get a good representation of the green background unless I photograph it outside.

The Fairy Tale Quilt is finally finished! 

I kept the last steps simple, just adding a piece of plain white sheeting to the back. This covered the mess of thread endings and wild stitching. Then I trimmed the edges, with a great deal of effort to get it mostly square, and covered them with my favourite spotty bias binding (from Boyes). The quilt measures about 70cm square, mainly because this is the size of my square table and that made it easy to lay everything out for working on. 

I probably shouldn't call it a quilt, which is usually defined as three layers stitched through to hold them together. There are three layers, as I had a middle sheet behind the green fabric to stabilise the applique stitching ( a bit. The surface is hardly smooth!). However, I haven't done any quilting on it and the only thing holding the layers together is the stitching on the bias binding. My reasons for not quilting it are firstly, the green background is already busy and the applique is detailed enough; and secondly, some of the applique is quite delicate and I didn't want to handle it any more than necessary. The straw and stick houses of the pigs are made of a loosely woven wool fabric, and are already beginning to become fluffy. I don't want the pigs to be without houses even before the wolf gets there!

All in all, I am very pleased with the way it has turned out. I've wanted to make something on this theme for a long time. However, there's plenty of fairy tales out there that I haven't included, so I'm not giving it up as a source of inspiration yet. 

In the meantime, there are always plenty more projects to get on with!


Sunday, 12 January 2025

Final Fairy Tales


This week, I've added the final details to the Fairy Tale Quilt. The fox has finally got the white patch on the end of his tale, and he's off to catch the gingerbread man and do all the other tricks that foxes are famous for. This fox doesn't look that crafty, but maybe it's all part of the act. 


Meanwhile, Rapunzel has turned up in her tower, with her long braid hanging out of the window. It's a good way to dry your long hair on a sunny day, unless a witch (or a prince) decides to clamber up it.

Rapunzel is one of my favourite fairy tales. I often wonder what she would do all day in her tower. She would surely have some sewing on the go, a stack of books to read and hopefully a paintbox, so she could capture the magnificent views from her high window. She must be busy with something, because she hasn't noticed there's a dragon just below, going about his business with a small smile.


Meanwhile, down on the river, the Wild Swans are gliding along, surprisingly serene having been changed from princes into swans by a wicked stepmother. Luckily they have a sister who will turn them back. There are seven of these swans on the quilt, but a quick look in my fairy tale books informs me that there should be eleven. Let's hope the other four have flown off somewhere - otherwise this might be the reason for the dragon's smile.


It would be easy to carry on adding elements to the quilt forever, but I think it looks full enough and is ready for finishing off. I have decided not to quilt it after all. Some of the pieces are quite delicate, and the beads and sequins would make using a hoop impractical. I've added a backing of plain sheeting to hide the tangle of stitching on the back, and will put a border round the edge. Then it's just a matter of finding a place to hang it, in a house already stuffed with quilts!


My resolution to sample new techniques has continued with corded quilting. There are instructions in Linda Seward's book, but I could find very few modern examples that I liked. It seems like a technique that, at the moment, is not very popular. There are some intricate historical examples on the V&A website, which are mostly done on plain fabric. I took that as an inspiration, and drew some interlocking wavy lines. I sewed parallel lines in bright colours, being careful to leave one channel clear where they crossed. Then I threaded chunky wool through with a darning needle. I was surprised how easy it was, and the results are quite pleasing. This little patch was meant to be a trial run, but, as often happens, it turned out quite well, despite being on a ragged scrap of cloth. I may add some seed stitching in the flat areas, to emphasise the cording even more. 


Sunday, 5 January 2025

Folded Star

It's a Brand New Year, and that means Resolutions! 


My first patchwork star, with added cross-stitch

I have been leafing through my collection of patchwork, quilting, embroidery and sewing books, and realised that are many techniques in there that I have never tried. 2025 is the year to put this right. I have set myself the task of making a set of samples using techniques I have never tried, with the critical rule that I have to read and follow the instructions instead of charging off in my own way. 

So on 1st January, I prised Linda Seward's Complete Book of Patchwork, Quilting and Embroidery, off the shelf and got to work on folded patchwork stars. 

The first four sets of folded triangles.

Carefully following the instructions, I used 2" by 3½" rectangles as the base, and folded over a ¼ inch seam along one long edge. These were then folded down the centre line, opened up again and the edges folded in towards the centre to make a triangle with two flaps. I pressed these as I did them so they would keep their shape - a fiddly job, which I usually wouldn't bother with, but the instructions were there to be obeyed.
All nicely ironed, four of these triangles were placed together on a backing fabric, and secured by a stitch at the point of each triangle. 


Round two of triangles. The folded shape can be seen better here.

Next, I added eight more folded triangles in a contrasting colour, lining them up (more or less) with the triangles already sewn down. The final step was to add a further eight triangles around the outside, again, securing at the points, and I also slip-stitched the final ring along the folded edges, to keep everything in place. Because this was just a try-out, I edge-stitched with the machine to finish. 

Finished folded patchwork star.


The result was a slightly wonky star. The layers made it pleasingly puffy, but it looked a bit dull, so, on impulse, and very much not in the instructions, I covered it with tiny cross stitches, with a single thread of floss. 


A much brighter version using 2 inch scraps.

It was time for a more artistic attempt. This time I used smaller rectangles in scraps of fabric. I found it easier to fold the triangles and then secure them with a couple of tacking stitches. This way I could make a whole pile of them, and press them all in one go just before sewing.  I also added another eight triangles around the edge, so the star has a double layer of borders. The star can be continued to be bigger than this - you would need sixteen triangles to make the next round. 

In the end, I was pleased with both results. The technique looks complicated, but it was quite easy to do, and there was very little sewing involved. The yellow star has a lovely 3D effect. But I don't find it the most practical of techniques. Quite a lot of fabric is used in the folding, and because there is little sewing, it probably wouldn't be very robust. 

The latest edition of Linda Seward's book is here . It's a great resource, with clear and detailed step-by-step diagrams throughout.

Sunday, 22 December 2024

Crafts of Christmas Past


Christmas is a great time for crafters - a time to get out the ribbons and sparkles, sequins and stars. I love making decorations for the Christmas tree. They are small enough to make quickly and can be as simple or as elaborate as you wish. This year I have added to my collection by making some couched wool stars. I've used up tiny scraps of wool on a base of felt. Thick and fluffy wools gave a lovely texture when they had been tamed, but  soft chenille and good old double knitting worked well too.  I used leftover threads for the couching, ranging from tapestry wool in the yellow star, to a mixture of metallic machine thread, embroidery floss and strong white cotton in the purple one. Once all the couching had been done, I cut out the star close to the stitching and oversewed the edges to a matching star shape. All the loose ends were trapped inside, and acted as a bit of padding. It was fun to play with the colours on these - the warm yellow star is my favourite.


Since they only appear once a year, Christmas ornaments tend to survive much longer than other homemade efforts. The little green patchwork tree below is about forty years old and was one of my very first patchwork makes, inspired by a picture in the Marks and Spencer Christmas Celebration book. A few years later, I'd moved onto hexagons and a more sophisticated effort with bead decorations.

The little angel originally had a satin dress, which frayed badly, and after a catastrophic fall from the Christmas tree a few years ago she was given a cosy new felt dress and new hair and halo, looking a lot happier for it. 

The angel and her trees.

Father Christmas pops up in various guises on the tree. Here, the sequined Santa was part of a huge kit of Christmas decorations that I sewed while living in America.  All the pieces were stamped onto sheets of felt and numbered, ready to cut out and sew. The sequins, beads and threads were all provided. There was a sheet of instructions with a perplexing array of symbols for what you should do where. The kit maker was Bucilla.

The middle Santa is made from Fimo modelling clay. I'm not sure why he's doing jumping jacks, possible an effort to slim down his perfectly circular belly. He's thin and flat and so rather delicate. I'm always glad to find he's survived another year when I unpack the box of decorations.

The last Santa is a finger puppet, which I used to produce in bulk for school Christmas fairs, which is why he is machine rather than hand sewn. Perhaps this one suffered the indignity of not being sold. He usually swings about on the lower branches of the tree with the bigger baubles. 


Father Christmas, of course, needs stockings to fill. The stripy stocking here was a very early effort, carefully hand sewn. I think the material came from a Laura Ashley patchwork pack, and it has a precious (though now rather grubby) velvet ribbon round the top. The tiny Santa inside is also made from Fimo. He is about three-quarters of an inch tall.

The green plush stocking was made when I acquired a sewing machine with embroidery stitches. It looks like I had fun trying them out, although nowadays I rarely use anything but straight and zigzag stitches. 

The end stockings are both made of felt, decorated with beads, stars and those lovely blue sequins, which it turns out weren't that useful for anything else. I love the curly toe shape of these, although Father Christmas must find it tricky squeezing the presents in. The longest of these stockings is about 4 inches. 


 Happy Christmas!

Sunday, 15 December 2024

Christmas Scraps


Every project produces a pile of scraps, whether it's fabric snippings, lumps of wadding or half lengths of thread. Of course these all get saved, because they will certainly 'come in useful' for something else. My fabric scraps are kept together in a large basket, and one afternoon, on a whim, I sorted them all into separate colour bags. This means less scraps fly about when rummaging for a particular colour. However, it also means that any new scraps have to be sorted into their correct bag, and this doesn't always seem like an appealing job. Therefore a new basket has appeared, full of scraps waiting to be sorted. 

I've been using blue, green and white scraps to make small squares and rectangles, with the idea of eventually putting them together somehow to make something. I'm using my favourite technique of raw edge applique, sometimes sewn over the edges and sometimes secured with tiny stitches all over the fabric. I've done both on this star, using metallic thread which makes it sparkle in the light (but not on the photo, unfortuately.) The size is about 3 inches square. 


Much scrappier is this little cottage in the woods scene (a favourite subject!). The sky and background were taken straight from the scrap basket without any trimming, and the trees and house cut roughly into shape. This piece is about 2 inches by 3 inches. I like its haphazard look and loose threads.


At last, the long-suffering Bare Rabbit has a piece of clothing that seems to suit him. In addition to the sewing scraps, there have been knitting and crochet projects over the years, not to mention some impulse buys, and so I have a drawer full of half-finished balls of wool. In here I discovered a bag of very small scraps, which I've crocheted up into a thick lumpy jumper for him. He looks a lot more at home in this than in fancy bloomers or the dreaded spotted dungarees. The colour combination has turned out very well -I'd be happy to wear this jumper too. 


 I improvised the pattern for the jumper, but Bare Rabbit was made from the Luna Lapin pattern. The website is here - https://www.coolcrafting.co.uk/luna-lapin/


Sunday, 8 December 2024

Gingerbread House

The last place to visit on the Fairy Tale Quilt is the Gingerbread House. I found the perfect  gingerbread coloured cotton for the walls, with a swirled chocolate roof. Some narrow rickrack turned into the icing, with sugary beads sewn on at the points. I thought the stripey bead looked like a mint, so that went on top. A large wooden bead made a chocolate button door handle, and I used tiny buttons in fudgy colours for the flowers and heart, all sewn on with the dreaded invisible thread. The candy canes gave me a bit of trouble. I tried to manufacture some free standing ones out of twisted thread coated with glue. They dried quite successfully, but attaching them was more of a problem. In the end I just embroidered them using a fly stitch, couched over with red thread.


The Gingerbread House features in the German tale of Hansel and Gretel, and far from being a cosy, welcoming place, it was meant to ensnare the children so the witch could fatten them up for eating, after their parents have abandoned them in the forest. I've added a trail of white beads on the quilt to show the trail of stones the children left to find their way home. 

Out of interest, I've looked in some of my fairy tale books to see how they described the Gingerbread Cottage. It seems the walls can be made of bread or buns as well as gingerbread, and the roof could be cake or marzipan. The windows are made of crystal sugar or barley sugar, and sometimes have nut-pastry frames, which sounds very tasty. You might also find brandy-snaps, raisins, lollipops and sweets to nibble on, and even candyfloss smoke coming out of the chimney. Who wouldn't want to go inside? Although it does seem a bit rude to march up to someone's house and start eating it, without asking first! 

Wikipedia mentions some interesting variations on the tale here, including a French version - La Cabane au Toit de Fromage, The Hut with the Roof of Cheese. I would find that house very tempting too.


When I've not been sewing this week, I've been relaxing with this jigsaw, which features a patchwork quilt designed by Kaffe Fassett. Quite a tricky one to do, in fact, involving peering at tiny pieces of the patterns and trying to match them up. Over the years I have found the work of Kaffe Fassett a huge inspiration, and own several of his books.
 The first one was Glorious Needlepoint, back in the eighties, and I still remember it being a revelation that you could put many shades of the same colour into a piece and get a beautiful result. I also have his Glorious Knitting book, much thumbed, and I made a pile of shawls on circular needles in wild colours following his patterns. The only adult jumper I've ever managed to knit was a blue and green sawtooth creation from this book. Sadly, it wasn't made to last, and I don't seem to have a photo of it in all its lumpy glory. 


This quilt was finished in 2008, and is my favourite of all the ones I've made. It was based on a design from Kaffe's Passionate Patchwork book, and is hand pieced and hand quilted. I can remember sitting on the carpet to quilt it, with one of our pet gerbils perched on my knee.


On a much simpler scale, here's a wonky little pencil pot, made from random stitching over scraps of toning fabric. Unlike the quilts, there was no planning in this at all. At first it was a bit of scrap to try something out on, then the stitching became denser and I liked the look and the feel of it, so I just carried on. By the time it was full, I like it too much to abandon it, so I sewed it onto a thick backing fabric and attached the bottom to a circular base. Little pots are always handy - I'll probably keep some playing cards in this one. I've included it here because it uses the same inspiration - lots of shades of the same colour, blended together. 

Kaffe Fassett's website is here


Sunday, 1 December 2024

Castles


This week I have been adding the finishing touches to some of the grander residences on the Fairy Tale Quilt. The castle in the very centre is composed of glowing tawny fabrics, with some deep blue starry stuff to add a touch of magic. It has good strong doors with hooks and eyes for hinges and knockers, and the design of the fabric give the impression of many windows. Perhaps someone is looking out, waiting for the arrival of Cinderella for the Prince's Grand Ball.


At the top of the quilt, we find the Sultan's Palace, bedecked with jewels. It may be that the genie has just conjured it up, as a grand home for Aladdin. However,  I have just started reading a  translation of the Arabian Nights , so I am hoping to discover a host of strange and wonderful characters who could be lurking in here. There will certainly be enough subject matter for a whole new quilt. Hmm...


A bit less grand is the castle of Sleeping Beauty. The briars are beginning to creep up the walls, but they have a long way to go to cover the castle. Inside, the king, queen, princess and everybody else are all snoring away gently. I knew that wicked witch was up to something!


When it comes to designing buildings, this book has been a great inspiration over the years. It has photographs of every type of building you could want, from tiny cottages to towering cathedrals, ghostly ruins to grand country homes, and a smattering of bridges, churches, lakes and rose gardens. It's especially good for when I want to do some drawing - the wonky angles of the old buildings are very forgiving if you can't draw a straight line!


Sunday, 24 November 2024

Dare you enter?


Last week we visited Grandma's comfy cottage with her washing on the line. But Grandma's neighbour
is a lot less welcoming. Here the Wicked Witch lives, in a cobwebby house with strange symbols on the door. Incy Wincy Spider has taken up residence on the roof, at least till the rain washes him down. The witch is out and about, wearing a enchanting gold swirled dress and casting spells with her magic wand. She's certainly up to no good.


Every Wicked Witch should have a black cat. This one has sneaked out of the house and popped next door to Grandma's cottage, where Little Red Riding Hood has foolishly left the basket outside. The cat doesn't look like he fancies the fruit cake, but there may be a jug of cream at the bottom of the basket. I'm sure Grandma is good-hearted enough to let him have a saucer full.


Someone else with a large appetite is Tiny Dragon, who lives in this cave. He has been catching fish in the river and had a bit of a feast. The little bat in the cave seems a bit worried that he might be next on the menu. Unfortunately, Tiny Dragon is not very houseproud; he has left his fishbones all over the floor, and his treasure is spilling out of the cave. 


Finally, we have the intrepid Mouse of Hickory Dickory Dock, perhaps out searching for cheese. He's on his way up the clock, but if we notice the time, he'll soon be on his way back down when the clock strikes one. Hopefully he won't run into the Witch's cat. 


There were lots of tiny bits to sew on this week, and I've spent a lot of time trying to get the invisible thread through the tiny hole of the beading needle, and, even worse, trying to undo the invisible knots. A little bit of witch's magic might have made it easier!


Sunday, 17 November 2024

Grandma's Washing Line

If Cinderella is looking out of her pumpkin-carriage window, she will have a great view of Grandma's enormous lacy bloomers on the washing line. These are surely large enough for the Big Bad Wolf to squeeze into, should he come calling, but Grandma must have very skinny legs, judging by her spotted socks. She is clearly a keen needlewoman and her cheerful patchwork quilt is out on the line too. 


At last, the frog has a crown. I had initially thought of this as a frog prince, but a better story is included  in 'The Starlight Princess' book mentioned last week. Here the frog is actually a clever princess with magical powers. In her frog shape, she marries the youngest of three princes and manages to outwit the lazy wives of the elder brothers. In this version of the story, she turns back into a princess and the pair dance away into the night, who knows where? A great ending for a story!
Like all fairy tales, there are many version of this, some of them not nearly so happy. There's some information about the story here .


Meanwhile, at the doorway to the Sultan's palace, someone has been rubbing the magic lamp. The genie is very flashy with his magic, bursting out in a flurry of stars. He's ready to grant the three wishes, but he's got a knowing smile on his face. What could possibly go wrong?


Sunday, 10 November 2024

Horses and Carriages


One of the most fun parts of making the Fairy Tale Quilt has been adding all the tiny details, with whatever comes to hand. This week, the two lumpy horses on the quilt, with physiques that  look like they could barely stand up, let alone pull a carriage, have finally acquired manes, legs and tails, while their carriages have got some wheels, to make the job of hauling around princesses a bit easier. 

Cinderella has a roomy pumpkin to travel to the ball in, with little net curtains at the window and sturdy wooden buttons for wheels, which hopefully won't joggle her around too much. 


Cinderella's pumpkin carriage trundles off to the ball

Meanwhile, the princess from Puss in Boots is taking a ride in this fancy carriage, pulled along by a rare leopard patterned horse with a steely glint in its eye. I had fun decorating the carriage with ribbons and sequins, and glossy buttons for the wheels. The Ugly Duckling, looking rather cute, is splashing about in his pond as she goes by.

The royal carriage, about to be waylaid by Puss in Boots.

Like everyone else, princesses get hungry, so I've added a handy baker's shop for them to call in at. There are five currant buns in the window, round and fat with sugar on top, made from tiny chunky buttons with a white bead sewn through the holes.
Hopefully no-one has noticed the Gingerbread Man making his escape down to the river. I wonder how far he will get. 

Off goes the Gingerbread Man


There are some feisty princesses in this book, illustrated with beautiful embroideries by Belinda Downes. My favourite is the African princess whose husband hatches out of an egg. They live happily ever after, of course, but she keeps the pieces of eggshell, just in case he needs to go back from where he came. 


Sunday, 3 November 2024

Little Trolls


Behind the recent parade of witches, ghosts and other beasties, the Fairy Tale Quilt has been progressing slowly in the background. It has its own share of monsters, though in my magical world, they are all quite amiable and unlikely to eat you, even if you do trip-trap over their bridges. The troll finally has his face back on, and sports a good head of woolly hair and plaited beard. It looks like he's doing a bit of a dance, maybe because the goats are all far away on the other side of the quilt. 


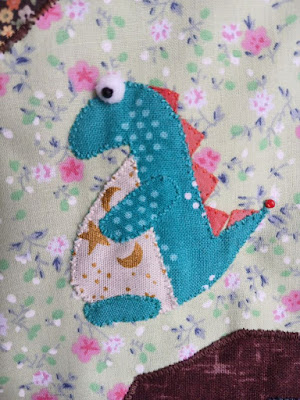
There's also a dragon on the quilt, looking a bit pensive. He's modelled after a favourite family toy, complete with pom-pom eye, although nowadays the real Tiny Dragon is looking a lot more raggedy than this. The brown shape at the bottom of the picture is his cave. Perhaps I will sew him a bit of gold and other treasures inside it, to please his dragonish tendencies. 


By the look of his stomach, Tiny Dragon has certainly just eaten something!


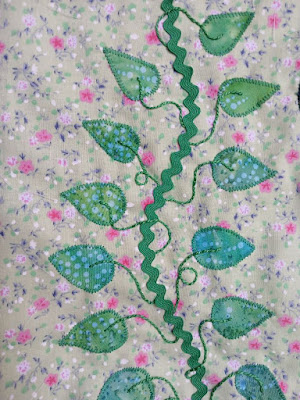
I enjoyed sewing the curly leaf stems onto the beanstalk, once I had finally decided which thread to use. It's a green perle thread, which matched the ric-rac stalk, and I have couched it on, rather than try to stitch with it. 

Trolls are common in Scandinavian folklore and there are some beautifully drawn ones in this 
a collection of magical tales illustrated by John Bauer, a Swedish artist. Like the one on the book's cover, these trolls dress themselves in furs and trinkets, and look out of the pictures with curious eyes.  


It doesn't hurt to have a small troll pottering about the house. This one was bought from a shop in Norway, picked out of a huge tub filled with his identical siblings. I wonder if he was pleased to be chosen? At any rate, he has made himself at home on my shelf, and is quite fun to draw, when I'm in the mood for a bit of sketching.
Tiny Troll and Happy Apple